Monthly Archives: September 2016

How to Register as an Amazon Seller

How to Register as an Amazon SellerHow to Register as Amazon Seller

Once you’ve put together a plan, for what you’re going to sell, and where you’re going to source it from, getting started with Amazon FBA is a straightforward process. This is how to register as an Amazon seller:

  • The first step is to register as an Amazon Seller, and you can begin the process by going to amazon.com/fba and clicking the “Get started” button if you’ve previously sold anything on Amazon before through Seller Central (Seller Central has a number of programs in additional to Amazon FBA). Sign in to your Seller Central account and click the “Add FBA” button.
  • If you’ve never sold on Amazon.com before, then click the “Sign up here” link under the “Get started” button, and provide all the necessary information. You can find more information about Seller Central by visiting amazon.com.
  • In order to complete the setup process, you’ll need to provide your business name, address, and contact information. You’ll also need to provide your credit card number; telephone number; and your tax ID (which is either your Social Security Number, or your Employer ID if you do business through an LLC, Partnership or Corporation).

Create Your Product Listing

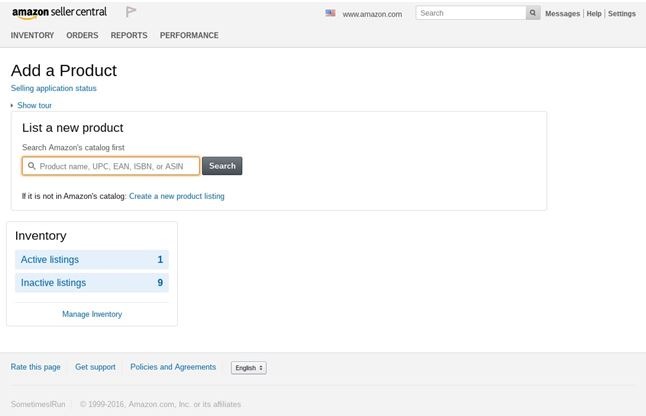
After logging in to your Seller account, mouse over the “inventory” link on the menu at the top of the page and click on “Add a Product.” You’ll then be taken to a page where you can enter the various details about your product, as well as upload photographs that show your item.

How to Register as an Amazon Seller

Consider the process by which many people shop on Amazon.com. They search by specific keywords and phrases, and the products that Amazon determines to be the most relevant to those searches will be displayed to the shopper.

Kind of sounds a lot like the Google search engine, doesn’t it? And the strategies for coming up with the best possible text for your product listing is similar, too.

How to Register as an Amazon Seller

Here are some tips for drafting your product listing:

  • Consider what words and phrases a potential purchaser is likely to use when searching for your product. Put those keywords at the beginning of your listing.
  • Use a keyword tool (such as Google’s Keyword Planner at https://adwords.google.com/KeywordPlanner) to help you identify various terms that are related to you product.
  • When you have a list of potential keywords, do searches for those terms on Google, eBay and even Amazon.com itself in order to verify the types of products that are displayed.
  • Identify the primary features and benefits of your product, and include that in the product description if possible.
  • If your product has multiple uses, include all of them in your product title.

Don’t just copy down whatever information about the product you received from the manufacturer. Treat your listing as seriously as you would the sales page on your own website because that’s essentially what it is.

Prepare Your Products for Shipping to Amazon’s Fulfillment Center

Depending on how your items arrived from your wholesaler, you may need to take the additional step of preparing those products for shipment to Amazon’s warehouse, so that they’re available for sale through your FBA account.

  • Labeling Your Products – Amazon’s fulfillment process is highly automated, so your product will need to be properly labeled. You may be able to use the existing UPC barcodes on your product (if your product is so labeled), or you might need to label them yourself with Amazon-specific identifying bar codes.

Once you’ve signed up for an FBA account, Amazon can walk you through the process of creating the necessary labels, although you will need to have your own printer and blank labels in order to do so. The detailed list of specific labeling requirements can be found here: https://www.amazon.com/gp/help/customer/display.html?nodeId=201100970.

Assign Your Inventory to FBA

After you’ve created your product listings in Amazon and prepared your products for shipment, you’ll need to assign them into your FBA inventory. In order to accomplish this you’ll need to do the following:

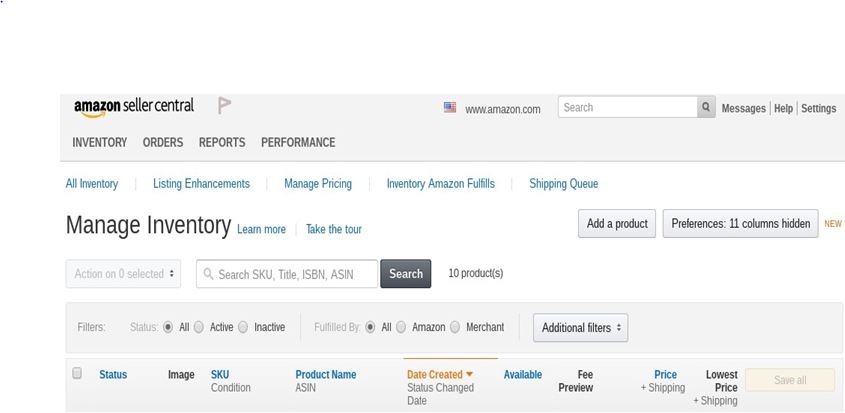
  • Log in to your Seller Central account.
  • Navigate to “Inventory” >> “Manage Inventory.”
  • Now select the products you would like to include as part of your FBA listings by checking the box next to those items in the leftmost column.
  • In the “Actions” pull-down menu, choose “Change to Fulfilled by Amazon.”
  • On the next page that appears, click the “Convert & Send Inventory” button.

Now you’re ready to physically-send your products into Amazon.com so that they can make them available for sale to potential customers.

Create Your Shipment to Send to the Fulfillment Center

In addition to the labeling requirements that we discussed above, you’ll also need to make sure that your items are packaged so that Amazon can quickly and efficiently pull them from inventory and ship them to your customers in single unit quantities. Your packaging must meet all applicable safety requirements that relate to both the products themselves as well as anyone who handles those products.

For example, if the product you want to sell is susceptible to dust or other damage either when it’s in Amazon’s fulfillment center, or as it’s being shipped to a customer, then Amazon has specific packaging requirements relating to those items.

So if you intend to package your manual coffee grinder together with a coffee mug, you must be sure that they’re securely packaged as a single item.

The complete list of requirements can be found here: https://www.amazon.com/gp/help/customer/display.html?nodeId=200243250. Be sure to visit that page if you are going to be selling any liquid, powdered, or granular products as well as jewelry items, and any item that’s particularly small.

What other questions may I answer for you on the topic of how to register as an Amazon seller?

Share Button

Repurposing Content to Jump Start Your Success

Repurposing ContentRepurposing content you create for your online business through blogging is the ultimate method of jump starting your success. After all, what better reason can you have for creating content regularly than to monetize it in ways that will also serve your target audience? So if you have been writing posts endlessly and are now ready to turn them into a variety of information products, online courses, presentations, guides, and even a book, then keep reading.

The first step is to make an honest evaluation of where you are right now with your blogging. If you are like me, then you have a couple of thousand blog posts that cover the various topics you discuss. But more than likely you are newer to this content marketing strategy of blogging and have fewer posts to choose from. In either case, assess which topics related to your niche you have already written, and from those which ones have gotten you the most traction with your readers.

Next, start brainstorming a list of what your target audience wants and needs from you on your topic. For example, the people who come to me tend to be new or newer entrepreneurs who want to build an online business they can run from home. So my posts are around this topic, and the many topics that come from it after someone gets started as an online entrepreneur. My goal in creating content is to answer questions and solve problems that arise once someone has launched their business.

After that, look at the content you have already created and think about how you can package it into products, courses, and books. My first book came from fifty posts I wrote on this blog back in 2010. Huge Profits with a Tiny List: 50 Ways to Use Relationship Marketing to Increase Your Bottom Line continues to be a bestseller and people from around the world write to me to ask more questions and to share their success stories. My other books also contain material I have repurposed from my live presentations, podcasts, videos, and more.

You may wish to start small by repurposing content from your blog into a short report. Combine three or more posts on a specific topic into a report that would be beneficial and of interest to a segment of your audience. If I were to do this I might be repurposing content I had previously written on the topics of affiliate marketing, content marketing, information products, or small business marketing. This would enable my reader to have more details at their fingertips on the specific area they wanted to focus on and learn more about right now.

The next logical step would be to repurpose the short report into audio recordings, and my podcast is perfect for that purpose. Then I would create a series of videos to close the loop on the different learning modalities.

Now it would be time to present this information in person, either at a local event I’m invited to or to a larger one where I am either hosting, attending, or presenting my information. You can start small with this part of the process, if necessary and then move up to larger venues. I became a public speaker by putting myself out there and being willing to skin my knees in the process. These days it’s difficult to get a microphone out of my hands once I have it. It all gets easier over time.

The final step in repurposing content, in my opinion, is to create online courses with your material. These courses may be taught live at first, and then put into home study for a longer period of time. I call my first live training Season One, then put it into Home Study, and then teach Season Two at a later date. You can see one of my most popular online training courses at Really Simple Content Marketing. Season Three will be coming soon.

Asking people to make a purchase from you is a big step, and a necessary one. Remember that someone must buy something in order for you to earn money. After you do this a few times start offering a membership site for recurring revenue. This allows you to get paid over and over again each month for serving the people who come to you for advice and training. It’s an excellent model, and very lucrative as well.

The best advice I can give you on this important topic of repurposing content is to jump in and get started. The idea of creating content once and then repurposing it over and over again is a solid marketing strategy that will serve you well as an online entrepreneur.

Share Button

How to Monetize Your Blog Posts

Monetize Your BlogMonetize Your Blog Posts

(This post is the fourth and final in a series on How to Update Your Blog. Be sure to read all four posts for the best results). Now we get to the fun part. Before we worry about prettying things up, let’s make sure this refreshed content will make us money. Ideally, each post and page on your website should serve a purpose. It could be that you’re growing a list, building a relationship with your readers, just plain entertaining them or selling them something.

For the purpose of this section of the report let’s assume you want to make a living from your blog. In that case, you need your readers to either sign up for your list so you can market to them via email, or make them an offer directly in the blog post.

If you chose to rework this particular blog post because you have the perfect product in mind to promote, this part will be easy. If not, take a few minutes and think about what the purpose of this particular post is. Do you want to encourage readers to sign up for your list? Or can you think of a product that would complement your content?

Take a few minutes to think about that and make a decision. Once you know what you want to promote or how you want to monetize your post, you can either write a call to action toward the end of your post, or work your recommendation directly into the content.

If growing your list is your goal, try adding a call to action and a signup form at the end of your post. This signup form can be different from the one you have in your blog sidebar. In fact, it should be so you can track where your signups are coming from. I find it helpful to craft a call to action that’s directly related to the content of the post.

Let me give you an example. Let’s say I have a blog about raising toddlers and this particular post was about recognizing when your toddler is ready to potty train. My call to action at the end of this particular post would be something along the lines of:

I hope this was helpful and I’d love to stay in touch. Of course, raising a toddler is about more than “just” potty training. Ready for more Toddler Tips? Enter your email below to sign up to the weekly Toddler Tips newsletter. I’ll also send you my ten best tips for dealing with temper tantrums.

Notice how the call to action flows from the content of the article to what the weekly newsletter and opt-in freebie are about?

Another option is of course to promote a product in your post. There are a few different ways to do this. By far the easiest method is to grab a graphic from the affiliate center (or a picture of your own product) and stick it right in the middle of your content. That’s also, by far, the least effective way to monetize your post. Another way you could monetize the post is by adding some code in there to display Google AdSense ads. Again, probably not your most effective way of monetizing your content – but it’s better than nothing.

Even better is to do something similar to what we did with the call to action to sign up for our list. Toward the end of your blog post, transition to a recommended product and let them know why you think it’s a good fit, or why you think they should buy it.

Better yet, make your recommendations right in the content itself. Once you do that, it starts to make sense to also incorporate product pictures. This is particularly easy to do if you are writing a blog post where you’re reviewing a product.  As far as monetizing old content goes, it can still make sense to work product recommendations directly into the content itself.

Let’s go back to our potty training example. As you go through the various signs to look for that let you know that your toddler is ready to be potty trained, mention that now would be the perfect time to order a potty seat. Then move into a product recommendation for your favorite potty seat available on Amazon.com for example.

Ok, that’s enough potty talk for now. I hope you’ve gotten some good ideas about monetizing your blog posts. Have another look through the post you’re updating and figure out what you want to promote and how you want to monetize it.

If your primary goal is to grow your list, grab the code for a new opt-in form and write a strong call to action that invites readers to sign up.

If your main goal is to promote a related product, be it your own or something you’re an affiliate for, think about how you want to incorporate it into your content. Grab your link and product images as needed and work them in.

Now that the old blog post is better monetized, let’s move on to step five.

Make It Pretty

Now that we’ve updated the content and made sure it will make us money, let’s make sure it looks good when our visitors come and visit the udpated blog posts.

Add to Your Email Autoresponder Funnel

There’s one more step to the process. It’s a little more content marketing you can do to get your revived blog post the best chance of taking off and getting spread far and wide. It’s also an easy way to stay in touch with your email subscribers and if you monetized the post, make a few bucks right away.

It’s adding the revived blog post to your email funnel. You can do this in a few different ways.

  • Send a quick email to your list to let them know you’ve updated the blog post. Invite them to click through and read it and ask them to leave you a comment.
  • If you have an autoresponder set up, consider adding a similar message to it so all of your readers, no matter when they sign up for your list get to see all your messages (and all your important revived posts).
  • If you create a weekly, bi-weekly or monthly newsletter, feature the revived post it in.

Again, the goal here is to start spreading the word about your content and get the ball rolling. Since everyone has multiple social media accounts these days, every single one of your subscriber has the potential of spreading your post to their own circle of influence. And all it takes is the right person to share it for it to get you a fair amount of traffic.

And all those social mentions and links will help with SEO (search engine optimization) as well for the long run.

Most importantly though, you want to share it because it is good content your readers will enjoy and find helpful. Your goal should always be to serve your audience and build a closer relationship with them. Only then will you find out how you can best help them and they will know, like and trust you enough to spend their money when you make a product recommendation.

Be sure to read all four posts in this series:

Updating Your Blog: Social Media Traffic to Your Blog

Updating Your Blog: Adding Images and Formatting

Updating Your Blog: Beginning Steps

And please leave a comment to share your thoughts and ideas and to connect with others who also have an interest in this topic.


Share Button

Social Media: Traffic for Blog Posts

Social Media TrafficSocial Media Traffic

Social media traffic is a huge part of how people find me and my websites. So let’s get back to something super simple. And since you’re already blogging the biggest chunk of work is something you only need to do once. Our task right now is to make sure it is easy to share our updated (and new) content via social media.

When we talked about images, I asked you to think about what social media sites are most important to you. Where is your traffic coming from? Where are you finding your target audience? Where are you making money? These are the social media sites you want to focus on here as well.

I’m sure you’ve seen plenty of blogs that have a big huge list of social share buttons at the bottom of their post. Chances are all those buttons aren’t doing much good. Instead focus on your main two to three social media sites and make it easy for people to share.

Do you get a lot of traction from Twitter? Make sure you make it easy to tweet out little key snippets of text from your posts. Get good results from Facebook and have your content shared around? Put a big Facebook button on those posts. Do a lot of new readers and customers find you via Pinterest? Make sure you have pin buttons on all images and pay close attention to the alt tags on your images. The alt tags will become the default description for your pins. So be descriptive and inviting. Try a few different types of calls to action and see what gets you the biggest click through rates.

Let’s break it down. There are two different types of work you’ve got to do here. The first is to make sure you have the share buttons in place you need on your blog.

The second part is to pay attention as you create or revive your blog posts. Make sure your alt tags are descriptive for Pinterest. Make sure you pick good tweetable quotes for Twitter. And make sure your images and descriptions do well in Facebook. If you don’t like the text Facebook auto pulls from your posts, try adding a different one in the meta description box in WordPress.

Got it? Great – go do that for your blog and the blog post you’re reworking right now and I’ll meet you back here when you’re done.

Driving Traffic

Now comes the exciting part. Everything is updated and ready to go. If you haven’t already done so republish or hit safe. Go look at your post and make sure everything looks the way you want it to. Try the links. Are they all working and are your affiliate links tracking ok?

Great. Now it’s time to get the ball rolling and give the post a little head start to get some traction.

Change The Date

Change the publish date to today’s date so your post shows up on the home page on your blog and gets send out via RSS feeds.  This alone will get some traffic coming to the new post and people may just share via social media etc.

Share on Social Media

Speaking of which… now is a great time for you to send out some of those social signals and make sure the stuff starts to get shared around on your best social media sites. Go ahead and pin your images. Then go back and re-pin it to one or two of your favorite group boards as it applies.

Share the post on Facebook, to your personal profile, pages you manage and groups as well. Don’t spam, but share it freely where it is welcome.

Don’t forget to tweet it a few times today as well. And work your mojo on whatever other social media sites you participate in.

The idea here is to get the traffic rolling and get things started. From here it will spread around. Some posts will do great and get you a bunch of traffic for a while, others may not. But they may surprise you a few months down the road. The key is to get the ball rolling and spread the word about your revived post. If nothing else, it will make sure that Google quickly indexes the changes. And you might just pick up a few new readers along the way.


Share Button

Adding Images to Blog Posts

Adding Images to Blog PostsNow we’re going to be talking about images. Pictures are a great way to add interest to a page and enhance the content. They are the perfect way to grab your reader’s attention. And in an age of Facebook and Pinterest, you have to have images in your blog posts.

We’ll go into a little more detail on social media in the next section, but for now, think about how you want to use images and how those images will apear when your post is shared on Facebook or Pinterest.

Different image sizes are recommended for Facebook vs. Pinterest and in general a horizontal image will do better in Facebook while Pinners seem to prefer vertical images. Think about which social media platform is more important to you and your target market. Where does your traffic come from? Actually a better question to ask is where your most profitable traffic comes from.

Once you know what social media site you want to focus on, optimize the image for that platform. In either situation it is usually helpful to text to the image. Think of it as yet another attention grabbing headline.

Not sure what I’m talking about? Look at the example below or head on over to Pinterest.com and take a look at images that fellow bloggers have added.

Let’s talk about a quick and easy way to create these images for your blog posts. The first thing you will need is a picture. You can take your own, or use stock photography.

Here are a few of my favorite stock photo sites that you may want to check out. Some provide free images, most you will have to pay for. Be sure to read the terms for each site and know what you can and can’t do before publishing someone elses picture or image.

Stock Photograhpy Sites:

  • MorgueFile.com
  • Pixabay.com
  • IStockPhoto.com
  • BigStockPhoto.com
  • DepositPhoto.com

Once you have your image – be it from one of the sites above or your own pictures, it’s time to do a little editing. Don’t worry. We’re not talking about anything complicated here and it doesn’t invovle expensive programs like Photoshop.

This is going to be fun and easy. There are a few sites out there that allow you to do basic photo editing. My personal favorite is PicMonkey.com. Just upload your image, change the size and resolution if needed and add some pretty text and other fun overlays and you’re done.

The PicMonkey.com image editor is very intuitive. Go ahead and give it a try. You’ll also be able to find plenty of online tutorials on how to do all kinds of fun and fancy stuff. Just Google it or head on over to Youtube.com for some easy to follow tutorials.

Let’s get back to what we are doing here. We want to enhance our content with one or two images that will also make it easy to share on social media sites.

Think about what kind of image would go well with your content. Then decide if you want to take it yourself or find something you can use on one of the stock photography sites.

Got your picture?  Take it over to PicMonkey.com and add an attention grabbing headline. Save your work and you’re ready to upload the image to WordPress or the blogging software of your choice.

Embed the image into your blog post where it makes sense and don’t forget to save your changes.

Most of the hard work is done. There are just a few more steps we need to take to make sure we’re getting the best possible results from all the hard work we’ve done editing, udpating and rewriting our content.

Formatting Your Blog Post

Having a well formatted blog post actually has two big benefits. It makes it easier to read, but it can also help with Search Engine Optimization. SEO is a big topic that’s a bit out of the scope of this short report, but I think it’s important to at least mention it here.

The basic idea behind SEO is that you pick a keyword or key phrase that you would like to rank for and then optimize your blog post around that phrase or keyword. Some of the ways to do this are:

  • Using the keyword in your post title.
  • Using the keyword in the URL of your post.
  • Using the keyword or related terms in headings, bolded or italicized font.
  • Using the keywords or related terms in the file names and alt tags of images on the page.

This is just a short list, but it shows you how a well formatted post can help you get more free search engine traffic.

It bears repeating. Always, write and format for your readers first, but keep the search engines in mind as well.

With that said, take a look at your content. Do a little keyword research, if you didn’t do this originally, and decide what you would like this particular post to rank for. Go through the list above and see if you are including the keyword in at least most of those areas. Don’t change the URL, because it will hurt you more in terms of search than help, and make sure your content still reads well. Don’t stuff your keywords in there unnecessarily. It will alienate your readers and may actually hurt you when it comes to organic search results.

Things like alt tags and image names are easy to add or change and bolding a keyword here and there won’t take more than a few seconds.

Back to formatting for your readers though since that’s our main goal here. Make sure it is easy to scan your post. Can your readers get a pretty good idea of what it is about by reading the headline and any sub-headings you may have?

Are you breaking the text down into small paragraphs to make it easy to read online? Are you using sub-headings and bullets to break things up and again, make it easier to consume the information?

If not, work on that now until you get the formatting where you want it. If you’re not sure, ask a friend or fellow blogger to take a look at it for you. Don’t worry if this seems hard at first. After you reformat a few blog posts, this process will become second nature.

Click here to read an earlier post on how to update your blog – beginning steps.


Share Button

Are You Taking Inspired Action in Your Life?

Taking Inspired ActionTaking Inspired Action in Your Life

The year was 2006 and I had taken steps to change my entire life. After twenty years of working as a classroom teacher, while simultaneously working as a real estate broker and residential appraiser, I walked away from both in search of a new way to earn a substantial living. In addition to these drastic moves, I also built a new home about twenty-five miles north of the city I had lived in for the past fourteen years. All alone in this venture I jumped at the opportunity for change.

At the age of fifty I was ready for a new life, but I wasn’t sure where to begin. Always being a person of great faith, I was sure that God would show me the way to whatever He had planned for me. It was blind faith on my part but it felt like the right thing to do if I were to have life experiences that I had been dreaming of for so many years. These included travel, financial freedom, and people to have these experiences with for the remainder of my life.

In my new community I was drawn to a small, non-denominational church. They met in the back of the Senior Center and welcomed me with open arms. Over the next few months I was introduced to the Law of Attraction, viewed the newly released film “The Secret”, and participated in discussions around the idea of taking inspired action. This was a new concept for me, as I had indulged in the “victim mentality” for all of my adult life. Things happened to me; I didn’t initiate the actions that led to the situations I was unhappy with on a regular basis. For the first time ever I understood what it meant to take responsibility for everything that came into my life experience. It was uncomfortable at first, and superbly empowering once I embraced and accepted this new way of thinking.

In the movie “The Secret” we were told that everything one wants or needs in every area of our life can be satisfied by believing in an outcome, repeatedly thinking about it, and maintaining positive emotional states to “attract” this desired outcome. But the people I was now surrounding myself with had a different take on this. They believed in the law of taking inspired action, which meant that we had to do much more than simply wish for and visualize what we wanted in our life experience. This made all of the difference in my life. Immediately I began learning and doing when it came to my brand new online business. Instead of creating a vision board of what I wanted to achieve, I actually took action by writing, creating, and engaging. Within a few months I was earning some income and this continued to grow.

People who had known me for years were quick to comment on the change they saw in me. They described me as being more focused and serious, yet also more playful and happy. They scratched their heads when I excitedly told them about my new online business. Timidly they asked if I had thought about returning to teaching or real estate “just in case” this new internet thing didn’t work out. I knew they only had my best interest at heart, so I entertained their inquiries while making it clear that I was working hard to make sure the new business would be a success.

But the thing was, I wasn’t working hard at all. Even though I was spending many hours in front of the computer each day, it was joyous at every turn. It was a new world for me and I was taking inspired action at every turn. Even though I had been into computers and technology since the very beginning, this was all new to me. And I had wanted to write since I was about twelve years old but seldom did, until now. My fingers (I continue to type with my two index fingers to this day) flew over the keys as I wrote articles, blog posts, short reports, and more. And as someone who had not wanted her photograph taken her entire life, I immediately turned into someone who was always ready for her close up!

The next step was to seek out like-minded individuals to walk beside on this new journey. I found them at conferences, workshops, and other live events and continue to call many of them friends. Once my business took off I was asked to be a speaker at many of these events, and the public speaking opportunities opened up yet another new world to me.

Looking back now I can see that I was ready for change in my life and open to new thoughts and Taking Inspired Actionsideas on how I could get there. I hope you can feel the excitement as you read my words here, as conveying these concepts around taking inspired action is what I most hope to achieve by sharing them with you. I know that the Law of Attraction can be a controversial topic for many people and I certainly understand why that is the case. But if you are willing to move to the next step by taking inspired action I believe you will find a world waiting for you to step inside and achieve all of your goals and dreams.

Are you taking inspired action in your life experience? What do you think about these ideas on how you can change your life by taking inspired action?

Share Button

Utilizing the Concept of Sweat Equity for Your Business

Sweat Equity for BusinessSweat Equity to Build a Lucrative Business

When I began investing in real estate back in the late 1980s someone told me about the concept of “sweat equity”. The definition of this term, according to the Internet is an interest or increased value in a property earned from labor toward upkeep or restoration. This proved to be true as I spent endless hours engaged in painting, landscaping, and a host of other activities to get the homes I was purchasing ready to be rented or to be sold.

The goal was to make a profit in the process, and this sweat equity saved money I did not have in order to increase the market value of the property. This also served to make me feel more connected to the project and much more likely to want to spend the time and make the effort to do the things in a manner that would expedite the return on my investment.

Sweat equity does not apply only to real estate; any business can prosper when the owner takes a more hands-on approach to building it up.

Then if sweat equity is the non-monetary contribution made by individuals on a project, doesn’t it stand to reason that most everyone would take advantage of this concept and become more successful in their business ventures? You would think so, but it’s actually not such a commonly acceptable and utilized practice

During the 1970s a family from Vietnam purchased the doughnut shop in my neighborhood. This was the first time I was aware of an entire family taking daily responsibility for a business, rather than only the owner and perhaps a spouse or other business partner. The mother and father were there every day at the crack of dawn, sweeping the sidewalk in front of the store and washing the windows, before they got to work preparing the dough and other items for that day’s doughnuts and pastries.

By eight o’clock the oldest daughter would arrive to begin working alongside them. She was probably eighteen or so and very serious about what she was doing. I was in college at this time and would stop in a couple of times a week to pick up a few chocolate old fashioned’s and a glazed twist. She always had the counter tops sparkling clean and organized, and the glass fronts on the cases was so shiny you could see your reflection clearly while making your selections.

Around three in the afternoon the younger children, a boy and a girl who appeared to be around ten years old showed up, and they would take turns serving the customers while doing their homework at a small table in between the front of the store and the area where the baking was done. It wasn’t until they had been in business for a year or so that I saw the youngest family member, a child of about three who was either the little sister or the oldest daughter’s child.

In my neighborhood the discussion of this family and their business was an ongoing and interesting one. The conclusion reached by many was that these practices were common for people from other countries, but that Americans would never put their children to work in this way. Looking back, I see that they missed the point entirely on how the “sweat equity” each family member was putting in would pay off handsomely in the future. What I would have given to have been a fly on the wall during their family discussions of this venture and the hopes and dreams they shared for their children, and perhaps even for family members still living in Vietnam.

Entrepreneur Mark Cuban says that “sweat equity is the most valuable equity there is”. What do you think? I believe this is an excellent topic for further discussion among small business owners and entrepreneurs. Do we do things differently in the United States when it comes to business? Are immigrants more likely to succeed because they are more willing to do what others will not when it comes to building up a business over a period of time? Have you ever put sweat equity into a business venture of any type?


Share Button

How to Update Your Blog: Beginning Steps

Update Your BlogTips on How to Update Your Blog

If you’ve been blogging for any length of time, you have a back catalogue of posts. They’re still getting a bit of traffic and there’s a lot of good information hidden in those posts. Here are some beginning tips on how to update your blog.

Some of the material may be outdated, some links may be broken and your writing, formatting and image creation skills have come a long way since those early days. In other words, there’s a lot you can do to make these older posts better. I started blogging in 2006, so over all of these years my writing has improved, as well as my ability to choose topics of greater interest to my readers. My focus has shifted from that of just attempting to get a post written and published to being able to craft a post that will make a difference to those who look to me for guidance in growing their online business.

You put a lot of time and effort into your blog post. Why not make sure you get the most from them by going back from time to time reviving them? Instead of writing new content, schedule some time each week to revive an old post or two.

Of course I’m not suggestion you should stop writing new content. That’s always a good idea. All I’m saying is that you should also set aside a little time to revive old blog posts and turn them into traffic, subscriber and money generating machines. There are two different ways you can tackle this. You can work in batches, doing step one for a couple of blog posts, then move on to step two, etc. Or you can start with one old post and work on it from start to finish. Pick whichever method works best for you. Either way it won’t take you long to revive old blog posts.

This is the perfect thing to do when you know you have a busy day ahead of you, but blogging is on your schedule and you’re readers are expecting a post.

Look at Your Stats

Choose some posts that are getting a decent amount of traffic and work on those first. They will have the biggest impact the quickest.

To do that you want to look at your website stats. Do you have a tracking program installed? Chances are that your web host is running some default tracking for you, and while that’s better than nothing, you want to make sure you get good data.

If you haven’t already done so, install Google Analytics on your blog. It’s free, very powerful and super easy to add. Once you have Analytics up and running, wait a few days to collect some useful data and then come back to this. Now look at your stats and figure out what your most popular posts are. You can do this in Google Analytics by going to “Behavior => Site Content => All Pages”. That will give you a list of pages (or posts if it’s a blog) on your website ranked by how often they were visited.

Browse through these pages and make a list of five to ten older blog posts to use in the next step.

Pick Your Blog Posts

Grab that list of popular blog posts from step 1 and take a look at them. Does one of them stand out to you?

Maybe it’s a post that doesn’t need a lot of work. Maybe you are looking at a post and you’re already getting ideas for things you can do to improve it. Or maybe you have the perfect product to promote in one of the posts. How you choose the first post to work through is entirely up to you. Pick something that sounds interesting, fun or profitable. Got it? Great.

If you are feeling ambitious, go ahead and make a list of the posts you want to work on over the coming days and weeks. I find it helpful to have a list with the post title, the URL, and notes about what changes I need to make.

A spreadsheet works really well for this. If you’re not a spreadsheet person, then make a numbered and dated list of what and when certain things will happen. This is crucial when you decide to update your blog and will keep you from getting confused and overwhelmed in the process.

Over these first few steps we’ll update the content, work on formatting to make the posts easier to scan and read, pretty it up with some images, make sure it is easy to share via social media and of course, monetize it. These are the types of things you want to make notes on in your spreadsheet or notebook.

That’s about all the planning we need to do. Just make sure you can log into your website interface – most likely that will be your WordPress dashboard – and edit those posts.

Update The Content

We’ve done the planning and figured out what blog posts need updating. Now it’s time to get to work to actually update your blog. The first thing we’ll focus on is the content. Start by reading through your blog post. Is the content still valid? Have some things changed?

Make note of any major changes you need to make to what you’ve written in the past. I find it helpful to grab a notebook and pen or open a word document and jot down what changes I need to make.

Sometimes the content is pretty evergreen and not much needs to be fixed. Other times, there’s a lot of rewriting to do to update your blog posts. The key is to have a plan and then just sit down and rework the post.

Something else worth thinking about is if you have learned something new to share since you first wrote the post. If so, you can either just rewrite the post, or write an update section to the post. Depending on what makes the most sense, you can add it to the top or the bottom of the post.

Last but not least, take a look at the comments the post has gotten since you first published it. Are there any great tips or questions your readers have shared? If so, you may want to highlight them within the updated post.

Make your changes, do your re-writing and save your work. Go get something to drink, go for a walk, or work on something else for a little while. Then come back and read over your rewritten post. It’s time to do a little editing to make sure no spelling errors made their way in in and that everything makes sense and flows well. These are the beginning steps to take when you are ready to update your blog.


Share Button

Podcast: Alicia Dunams on Entrepreneurship

Alicia DunamsAlicia Dunams has coached thousands of people to write, publish, and market their books through her acclaimed Bestseller in a Weekend program. In this program she teaches entrepreneurs how to become an industry expert, increase their credibility, and create new opportunities for themselves through the power of a bestselling book. And even though she lives in southern California, our paths had never crossed. Always on the lookout for additional entrepreneurs to introduce to my community, I was thrilled when Alicia agreed to join me for this podcast interview. I know you will resonate with her message and be inspired to play bigger in your own business.

Formerly an international fashion model, Alicia traveled the world before settling down and beginning her entrepreneurial journey. It all began in the summer of 2007 after she published her book, Goal Digger: Lessons Learned From the Rich Men I Dated.

During this interview Alicia shares exactly how and why she started down this path and how authorship and information products are an important part of this journey.

I encourage you to listen to this podcast, through the link here or by subscribing to my podcast series on iTunes, and then download Alicia’s free eBook on How to Get Your Book Done Fast so that you may connect further with her in the near future.

Subscribe To All Interviews In My Podcast Series

Share Button